So I've been thinking a lot lately about decorating a hypothetical new place. I have an obsession with pinterest.com - I get so much inspiration there. I saw this piece from Mini Moz and thought, "Hey! I could do that!" So I did. And I think it will be perfect in our new home (wherever and whenever that might be).
Here's how you make your own:
First . . . Decide how many places you want to put on your "map." I think four would be the max, but you could do as few as one. Just depends on you and your life. I did four, so that's what I'll do in the tutorial, but you'd need to adjust your spacing for less than four.
Second . . . Go get your maps at the USGS Map Store. Click on "Map Locator and Downloader." Then type in the location you want in the search box. A red marker will appear for the maps available for your area; click it and download the 7.5 minute map. Click the "Add Files to Bundle and Download" button:
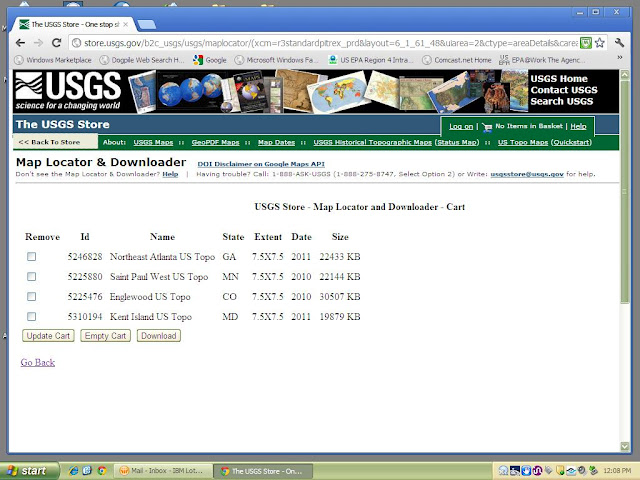
Once you've retrieved all of the maps you want, click the "View Download Cart" button, which will take you to this page:
Click "Download." This will give you a zip file with all of your maps. They're all pretty large, so be patient as they download. (I'm assuming you know how to open and unzip files).
Third . . . Let's get started with your maps! Open whichever one you want to work with first. The process will be the same for all maps, so just pick one and let's get going. (I'm going to start with A-town, since that's the name of this blog). You're going to want to turn off the orthoimage (which is the background satellite image) - it makes it too busy and gunks up the cool quad map-feel.
In the PDF, click on the "plus" sign next to "Images."
Under "Images," you will see an eye icon next to orthoimage. Unclick it.
Now, you have just the topo without the satellite image.
Under File, select "Take a Snaphot." Then select the area you want for your heart. I suggest that you pick an area that is roughly 3 lat by 3 long (that's 3 yellow squares by 3 yellow squares for the uninitiated). You might have to tinker a bit to get it to center on an area that's both: (1) important to you; and (2) aesthetically pleasing. I leave that to you.
Fourth . . . Open the Paint program. Under Edit, select Paste. Now your base map is in the Paint program. Save it, and exit Paint.
Fifth . . . You need to find a heart template. I used this one:
Open it in Paint. Then, under Image, uncheck "Draw Opaque." Save it (you'll need it for all your hearts). Then select the "Select" tool (dashed box), and select an area as close around the heart as possible.
Sixth . . . Reopen your base map in Paint. Then paste the heart template in. Drag the bottom right corner of the heart template to match the bottom right corner of the map, so that the heart template takes up most of the map:
Seventh . . . (and this is the really tedious part). In Paint, erase all the map areas outside of the heart template using the Eraser tool. I found that you can pretty quickly do most of it in the normal view, but then you have to go to View, then Zoom > Large Size, and manually erase around the heart template. You don't want any stray marks outside the heart.
Repeat steps 3 through 7 for each heart.
Now you're ready to put together the complete file! Here we go . . .
Eighth . . . Open either Microsoft Word or Microsoft Publication. (I used Publication, so that's how this Tutorial is set up). Set up your document to be an 11-inch by 17-inch document in landscape orientation. Under the View tab, select Zoom > One Page. Also, make sure you have the ruler showing (View > Show/Hide > Ruler). Set your margins to 1" on all sides.
Now, we're going to add some guide lines so we know where to put our hearts.
For 4 hearts, add vertical lines at the following locations, by selecting Insert > Shapes, then selecting the straight line. Make sure to hold Shift down while you draw your line, which will keep it straight.
- 2-7/8"
- 4-3/4"
- 6-5/8"
- 8-1/2"
- 10-3/8"
- 12-1/4'
- 14-1/8"
Tenth . . . Add text boxes underneath each heart, center the text, and type what that place means to you. Ours say: "where we met"; "where we married"; "our first home"; and "where baby made three." Pick a cute font. I used Script MT Bold, 26-point.
Eleventh . . . Insert a text box for the heading. Center the text. I used Georgia (naturally), in 80-point for our family name, and Script MT Bold, 48-point, for our "established" year.
Finally . . . Publish the document to a PDF. Then either print it yourself (assuming you have access to a good quality color printer that can do 11 x 17), or send it out for printing. I used FedEx Office's online printing. It cost me $1.88.
I used a Ribba frame from IKEA, which cost $14.99.
Total project cost: about $18.


No comments:
Post a Comment